Most garage shelving and cabinets fail for the same boring reason: nobody checked what the wall was made of. The box said 2,000 pounds. The bracket was stamped steel the thickness of a soda can. The drywall quit sometime in March, quietly, and you found out when the fertilizer landed on your car.
I'm Pete. I have been a general contractor in Columbus, Ohio for 20 years, and I have organized more garages than most people have parked in. I built my first wall system out of plywood and stubbornness, watched it sag under a loaded tool chest, and replaced it with steel the following spring. Since then I have installed and torn out enough garage shelving and cabinets to know that the difference between a system that lasts 15 years and one that fails in two comes down to three questions: what is the wall made of, what are the brackets made of, and can you move a shelf six inches without rebuilding the whole thing.
This guide answers those three questions in order, then walks through the install step by step.
Why you should trust me
Twenty years of framing, remodeling, and garage builds in central Ohio means I have seen every way a homeowner can talk themselves into a bad mount. I do not review storage I have not loaded. My test loads are the same ones that break cheap systems: a full tool chest, two bikes, lawn equipment, and the 17 boxes my wife keeps asking me to deal with. If a system cannot hold those without shifting, I say so out loud.
I also tell clients when the answer is that they do not need to buy anything, they need to find a stud. That happens more often than you would think, and it is free advice.
How I picked and how I tested
I judge garage storage on four things, in this order:
- What the frames and brackets are actually made of. Steel beats plastic, and welded beats bolted in most cases.
- Whether the mounting hardware matches the weight rating printed on the box. The box lies. The bracket does not.
- Whether I can reconfigure it later. A system you cannot change is just expensive shelving.
- Whether I would trust it with my own tools. That is the entire test.
For this guide I am working with two different answers to the same problem: a fully welded steel cabinet wall, and a freestanding industrial shelf unit. One hides your stuff behind doors. The other puts it on display and holds a lot more of it per dollar. Most working garages want some of both, and the layout advice below assumes you are running them side by side.
What you need before you start
- A stud finder. It is the most important tool in garage storage and the one everyone skips.
- A 4-foot level and a torpedo level.
- A tape measure and a pencil you can see against drywall.
- A drill or impact driver with a bit set.
- Structural screws or lag screws long enough to bite at least 1.5 inches into solid wood.
- Composite shims. Garage slabs have pitch, and pitch is why cabinets lean.
- A second person for the last 10 percent of any cabinet install. Steel is heavier than it looks in photos.
- A dolly or a hand truck. Your back is not a mounting bracket.
If you are mounting anything overhead, verify the joists and the hardware before you drill. Drywall anchors do not belong above your head. Ever.
The two pieces I would build around
One is the closed storage wall, and one is the open workhorse. Here is the honest breakdown of each.
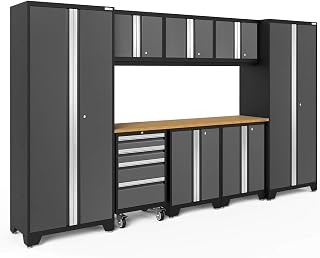
The cabinet wall: NewAge Products Gray Bold Series 9PC Garage Cabinetry Set · 24-Gauge Steel · Fully Welded · 132" W x 18" D x 76.75" H, 50408
 Visit on Amazon →
This is the piece that makes a garage look finished instead of assembled. Fully welded 24-gauge steel frames, nine pieces in the set, 132 inches wide, 18 inches deep, 76.75 inches tall. Check current Amazon price.
What the specs tell you, and what they do not: 24-gauge steel is a legitimate cabinet gauge, the same class most mid-tier garage cabinetry uses, and fully welded means you are not bolting a frame together out of flat-pack brackets and hoping. What no listing can tell you is whether your wall is flat, whether your floor is level, and where your studs actually land. That is your job, and it matters more than the gauge.
Practical notes from installing cabinet runs like this one. The units arrive in several boxes and they are heavy, so clear the garage floor first and use a dolly. Plan on shimming the base if your slab has pitch, because a 132-inch run multiplies every quarter inch of slope across the span. Anchor the frames into studs even though these are cabinets and not shelves. A tall cabinet full of paint and solvents is a tipping hazard, and the doors hide how badly it is loaded.
Flaws but not dealbreakers: Closed cabinets hide clutter, which is the point, but they also hide whatever you shoved in there last October. Label the doors or you will end up owning three caulk guns. The set width is also fixed, so measure your wall before you order, not after the boxes are in the driveway.
Anyone who wants the garage to read as a room rather than a pile, and who has a clear wall roughly 11 feet wide, will get the most out of this.
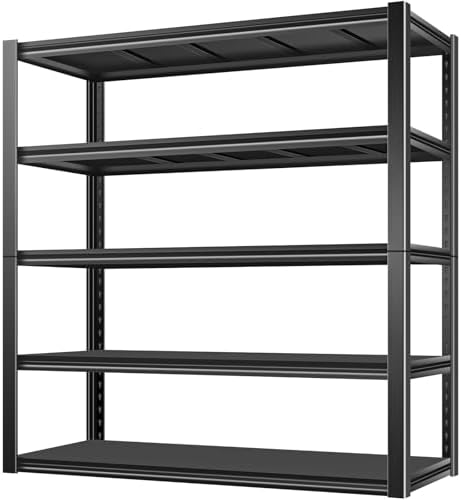
The open-bay shelf: BILT HARD 2750LBS 48" W x 24" D x 72" H Garage Shelving, 5-Shelf Industrial Storage Shelves Heavy Duty, Metal Shelving Units with Adjustable Shelf, Steel Utility Shelves, Black
 Visit on Amazon →
This is the other half of a working garage: open bays for the things you grab every week. Five adjustable shelves, 48 inches wide, 24 inches deep, 72 inches tall, with a 2,750 pound rating for the unit. Check current Amazon price.
Read that rating the way a contractor reads it. A 2,750 pound figure for the unit is not 2,750 pounds per shelf, and it assumes an even load on a level surface, which a garage slab usually is not. Spread heavy items across the lowest shelves, keep the weight centered over the legs, and put bulky light stuff up top where you can reach it with one hand.
Because it is freestanding, it does not care where your studs are, which is a genuine advantage on a wall that is nothing but concrete or a garage door track. Freestanding also means it can tip. Anchor the top of the unit to a stud with an L bracket. That is a 10-minute job and it is the difference between a shelf and a hazard.
Flaws but not dealbreakers: Open shelving collects sawdust, and in a garage, everything collects sawdust. Bins and cardboard boxes solve most of that. The 24-inch depth is generous, so check that you are not blocking a door swing or a garage door track before you commit to the spot.
Anyone who needs bulk storage for bins, tools, and lawn equipment without paying cabinet money should start here.
Planning the layout before you buy anything
Do this with a tape measure and a piece of paper. It takes 30 minutes and it saves a return shipment.
Measure the wall, not the room. Cabinet runs and shelf units are sold by width, and a two-car garage wall is rarely the clean 20 feet you remember. Note outlets, hose bibs, the garage door track, and the step or curb at the base.
Mark the studs on the wall in painter's tape. Every 16 or 24 inches, however your framer felt that day. If you cannot find studs, that is a finding, not a failure. You may be looking at a concrete wall, which needs a different anchor plan entirely.
Decide what lives where before you decide what to buy. The rule I use with clients: the stuff you touch weekly goes at eye level, seasonal stuff goes up high, and heavy stuff goes low. That single rule organizes most garages better than any product.
Then split the wall. Closed cabinets go where the mess is ugliest and where you want a clean look, usually the wall facing the house door. Open shelving goes where you need volume and access, usually the side wall or the back wall. Keep the shelf unit out of the swing path of your car doors.
The actual install workflow
Step one: Find the studs and mark them. Use the stud finder, confirm with a thin finish nail where you are unsure, and mark each stud with a vertical strip of tape. Mark the height you plan to fasten at too, so you are not hunting later.
Step two: Check the floor pitch. Set your level on the slab where the cabinets or shelves will sit. Most garage slabs slope toward the door, and some slope a lot. Note how much, because that number decides how many shims you need.
Step three: Build the cabinet run first. Assemble the base units on the floor, shim them level side to side and front to back, then anchor the frames into the studs with structural screws. Level matters more than plumb on a cabinet run, because doors that are out of level swing open on their own and never sit right.
Step four: Set the uppers and the tall pieces. Get a second person. Lift the tall cabinets into place, shim, and fasten into studs at the top and the bottom. Do not rely on the base cabinets to hold the uppers.
Step five: Assemble the shelf unit where it will live. Build the shelf unit in its final position if you can, because moving a loaded 72-inch rack is a bad afternoon. Level the feet with shims, snug the shelf clips, and press down on each shelf to seat it.
Step six: Anchor the shelf unit to the wall. One L bracket into a stud at the top rail is enough to stop a tip. If the wall behind it is concrete, use a masonry anchor rated for the load, and if the wall is drywall with no stud where you need one, add a horizontal 2x4 backer screwed across two studs and anchor into that.
Step seven: Load it bottom-heavy and check it in two weeks. Put the heavy bins low, the light seasonal boxes high, and keep the load balanced left to right. Then come back in two weeks with your level and check the cabinet run and the shelf unit again. New fasteners settle. Re-snug anything that moved.
Step eight: Live with it before you buy accessories. Use the system for a month before you spend another dollar on hooks, bins, or dividers. You will learn what you actually reach for and where the dead zones are. A garage system you can reconfigure is worth twice one you cannot.
What I left out and why
Wire shelving is cheap and it works for light duty, but it sags under real weight and it is miserable to clean. Plastic resin shelving is fine for a rental and a box of holiday decorations, and nothing more. Wall track systems are a genuinely good answer for bikes and long-handled tools, and they belong in a different guide, because they solve hanging storage rather than floor storage. None of those are bad products. They are just the wrong tool if you are trying to get a tool chest, two bikes, lawn equipment, and 17 boxes off the floor.
What this all costs
The cabinetry set is the larger line item (Check current Amazon price) and the shelf unit is the smaller one (Check current Amazon price). Add your fasteners, shims, and a couple of L brackets, which is a small number next to either purchase.
The cost that actually matters is the one nobody budgets: a Saturday for the cabinets and an afternoon for the shelf unit, plus two weeks of living with the layout before you finalize it. Compare that to replacing a sagging plywood shelf every three years and the math stops being close.
The bottom line
Find the studs. Match the hardware to the load. Shim the pitch. Anchor everything that is taller than it is wide. Then put the heavy stuff low and the weekly stuff at eye level, and leave yourself room to change your mind later.
Do those things and the cabinet wall and the shelf unit will outlive the garage they are sitting in. Skip them and you will be writing me an email in March about your fertilizer.