
There are two kinds of overhead garage ceiling storage racks: the ones still hanging square after ten years, and the ones bowing in the middle because somebody trusted the anchors that came in the box. The rack is almost never the problem. The mounting is.
I have been framing, fixing, and reorganizing garages around Columbus for twenty years, and I have watched the same failure happen over and over. A homeowner buys a good rack, reads the instructions, drills into the ceiling, and hangs a hundred pounds of holiday bins from four little plastic sleeves sunk into half-inch drywall. It holds for a season. Then the drywall craters, the rack drops an inch, and the whole thing ends up leaning against the wall waiting for a trip to the dump.
An overhead garage ceiling storage rack done right is one of the best deals in home storage, because that ceiling space is already yours and you are not using it. It just has to be fastened to something that can actually carry the load. Here is the sequence I use, in the order I use it.
Why you should trust me
Twenty years as a general contractor means I have hung overhead storage in new builds, 1950s garages with three layers of paint on the ceiling, and one detached shop where the joists were so far apart I had to add a header before anything could go up. I have also taken down more failed racks than I have installed, which teaches you faster than installing does.
My rule for anything overhead is simple: I will not hang a rack unless I can see or confirm the framing and the fasteners. A shelf that holds a box of Christmas lights proves nothing. Overhead storage holds a real load, over a real car, for years, and the ceiling does not get a day off.
I do not sell storage systems. I install them, and when they fail I get the callback, so I have a strong opinion about brackets, joists, and the hardware that connects them.
The two things you actually need
This job has a rack side and a box side, and people forget the second one. The rack carries the weight. The tape keeps the contents from turning into a pile of dust-covered cardboard up there.
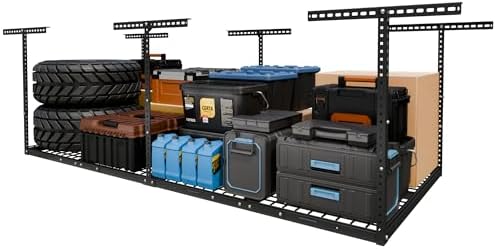
The rack: FLEXIMOUNTS 4x8 Overhead Garage Ceiling Storage Rack Organization, Black
 Visit on Amazon →
A 4x8 overhead rack is the size that makes sense for a two-car garage. It runs the long dimension across multiple joists, which is exactly what you want, because spreading load across four or five joists is a completely different structural conversation than dumping it all onto one. Check current Amazon price.
The important thing to understand about any rack in this class is that the deck panels are not what holds the weight. The frame and the ceiling fasteners are. That means your install quality matters more than the box contents, and the included hardware is a starting point, not a finish line. Read what it ships with, then decide whether you are upgrading the lag bolts at the hardware store. I usually do.
Flaws but not dealbreakers: An overhead rack is a commitment. Once it is up and loaded, you are not moving it on a whim, so measure twice and think about where the cars actually park before you drill.
Anyone with a standard two-car garage and exposed ceiling joists in decent shape will get their money's worth here.
The tape: Scotch Heavy Duty Packing Tape, 1.88 in x 800 in, 6 Rolls
 Visit on Amazon →
Check current Amazon price. Here is the part nobody plans for. The moment you decide to store boxes overhead, those boxes have to survive a garage. That means temperature swings, humidity, and dust, and it means the flaps need to stay shut while you are lifting a thirty-pound box over your head with one hand.
Cheap tape fails in exactly that moment. It lifts at the corner, the box opens as you are sliding it onto the rack, and you learn a new vocabulary. Heavy duty packing tape with a real adhesive holds the seam, and the six-roll pack is the right quantity for a full garage purge because you will tape more boxes than you think. Label every box on two sides before it goes up.
Flaws but not dealbreakers: It is tape. It will not fix a box that is already crushed, and it will not hold a seam on a wet cardboard flap. Let boxes dry before you seal them.
Anyone loading a rack with seasonal bins, camping gear, or the archive of childhood art projects will burn through a roll or two in an afternoon.
Find the joists before you buy anything
This is the step people skip, and it is the only step that actually matters.
A garage ceiling is usually drywall screwed to ceiling joists, which are the horizontal members running across the width of the garage. In most homes those joists sit 16 or 24 inches on center. Your rack has to fasten into them, not into the drywall between them.
Three ways to find them, in order of reliability:
- A stud finder. The deep-scan setting on a decent finder will locate ceiling joists. Mark both edges of each one, not just the center, because you want to know how wide the member is before you drill.
- The tap test. Knock across the ceiling with a knuckle. A hollow thud is the cavity between joists. A dull, solid thunk is the joist. This works better than people expect once you have done it a few times.
- A small pilot bit. When the first two disagree, drill a 1/16 inch hole where you think a joist is and look at what comes out. Drywall dust means you missed. Wood shavings mean you found it. Patch the hole with spackle afterward and nobody will ever know.
Once you have located the framing, do one more check before you commit. Look above the ceiling if there is attic access, or use a flashlight and a phone camera through a small hole. You are looking for wiring, plumbing, gas lines, and ductwork. Drilling a lag bolt into a water line is a very expensive way to learn this lesson.
Also confirm the joists are actually wood and not engineered I-joists with a thin web. You can still mount to I-joists in many cases, but the fastening rules change and you should follow the manufacturer's guidance for that specific situation.
How to install the rack, step by step
Step one: Clear the bay and stage your materials. You cannot work over a car. Pull it out, sweep the floor, and lay the rack components out where you can reach them. Have your fasteners, a drill, a socket set, a level, and a tape measure within arm's reach.
Step two: Mark the joist centers on the ceiling. Use painter's tape or a chalk line. Write the spacing on the tape. You will look at this mark a dozen times during the install and it saves you from guessing.
Step three: Dry fit the frame. Assemble the rack frame on the floor first, then raise it and hold it against the ceiling in its final position. This is a two-person job. One person holds, one person checks the position against the joist marks. Do not drill anything yet.
Step four: Confirm every mounting point lands on framing. Walk the whole frame. If a mounting hole falls in the cavity between joists, you have two choices: shift the rack until it lines up, or add a horizontal blocking board spanning two joists and fasten the rack to that. Do not "make it work" with a drywall anchor. Ever.
Step five: Fasten into the joists. Lag bolts or heavy structural screws, long enough to get real bite into the joist without poking through the roof sheathing above. If your garage ceiling joists are exposed in an attic, check the bolt tips from above. If you are not confident about bolt length, go one size shorter and add blocking rather than one size longer and risk the roof.
Step six: Check level as you tighten. Tighten in a cross pattern, the way you would torque a wheel, and check the level after every few fasteners. A rack that goes up twisted will stay twisted, and every box you slide onto it will slide back toward the low corner.
Step seven: Install the deck panels and cross supports. Follow the manufacturer's order. Panels go in after the frame is secured, not before. This is also when you check that nothing is pinching wiring you found earlier.
Step eight: Load it from the joists down. Put the heavy stuff directly over the joist lines and the light stuff at the edges. Do not load the center of the span first and work outward. Distribute the weight evenly across the whole rack and keep the heaviest items over framing.
Step nine: Wait a week and check it. Come back in seven days with a level and look at the frame. Fasteners settle into wood. If something has moved, you want to catch it now, not after a winter of temperature swings.
What belongs up there and what does not
Overhead storage is for dead load, which is the weight the ceiling carries permanently, not just on install day. That word matters. Your ceiling has been carrying drywall, insulation, and maybe attic storage for decades. Adding a rack adds to that forever.
Good candidates: holiday decorations, empty coolers, camping gear, luggage, seasonal clothing in sealed bins, light sporting equipment, and anything you use once or twice a year. Tape the boxes shut so dust stays out, and label them on two sides so you can read the label from the garage floor.
Bad candidates: paint cans (they leak, and they are heavier than you think), engine blocks, bags of concrete, water heaters, anything alive, and anything you would be upset to see land on a car. If you would not want to drop it from ceiling height onto a windshield, it does not belong overhead.
The mistakes I see most
Using the included anchors. Drywall anchors are for pictures. They are not for ceiling storage, no matter what the packaging implies. This is the single most common reason overhead racks fail.
Skipping the joist verification. Assuming the joists run one direction because they run that way in the house is a coin flip. Verify.
Loading the rack before the fasteners settle. Give it a week, then recheck. Wood moves.
Mounting to the bottom chord of a truss without checking. Trusses are engineered as a system. Hanging a point load off the bottom chord in the wrong place is a real problem, and it is worth a call to a framer or engineer if your garage has trusses instead of dimensional joists.
Forgetting the pitch of the floor. Your garage floor slopes toward the door. That does not affect a ceiling rack, but it matters if you are planning cabinets or a wall system underneath, because those will need shims.
What this costs
The rack is the main line item, and the tape is a rounding error, so buy the good tape and stop thinking about it. Beyond that, budget for upgraded fasteners, which usually runs a few dollars at the hardware store, and possibly a piece of blocking lumber if your joist spacing does not line up with the rack's mounting holes.
The one cost people do not plan for is the second weekend. This is not a one-afternoon project if you do it correctly, because you need the install day and then the follow-up check. My rule is two weekends minimum for any garage storage project: one to build and mount, one to load, sort, and label.
Compare that to what you would pay someone like me to do it, and the math gets easy fast. The rack itself is a one-time purchase that outlives most of what you put on it.
The short version
Find the joists. Confirm what is above them. Fasten into wood with real structural hardware. Spread the load across as many joists as the rack will reach. Load it evenly, wait a week, and check your work.
That is the whole job. Do it in that order and your overhead garage ceiling storage rack will still be square when your kids are old enough to be hauling their own stuff up there. Skip the joist step and you will be writing me a sad email about a sagging ceiling.