Most garage storage fails in the same place, and it is not the shelf. It is the two inches of drywall between the bracket and the stud nobody found. I have pulled enough collapsed wire shelving out of central Ohio garages to recognize the pattern: buy a kit, read the weight rating printed on the box, drive four screws into drywall, load it with a toolbox, and wait. Three weeks later the shelf hangs off one anchor and the wall looks like it lost a fight.
A garage storage system installation that survives an actual garage is not complicated. It is four decisions made in the right order, and only one of them involves a brand name. Get the order wrong and a premium cabinet set sags exactly like the cheap one.
Here is the order I use on client jobs, and the two pieces I would put on the wall first.
Why you should trust me
Twenty years as a general contractor in Columbus, and I have organized more garages than most people have parked in. I built my first wall system out of plywood and frustration, watched it sag under a loaded tool chest, and replaced it with steel once I got tired of re-hanging it every spring.
My rule has not changed since: wall systems are only as strong as the studs behind them, and a spec sheet does not know your drywall. I test storage with contractor loads, which means a full tool chest, two bikes, the mower, and the seventeen boxes my wife keeps asking me to deal with. If a rack cannot take that, it does not get written up here.
How I picked and how I tested
I will not recommend a wall system I have not hung with real weight on it. For every candidate I check three things before anything goes on a wall: what the bracket is actually made of, whether the included mounting hardware matches the rating printed on the box, and whether I can move the whole thing in two years without patching drywall.
The rating on the box is the least trustworthy number in the garage. Steel beats plastic, every time, and the bracket is where failure starts. If the hardware in the bag is drywall anchors and you are hanging anything heavier than a hose reel, those anchors go in the trash and you go find a stud. Weight ratings are honest only when the mounting hardware matches them.
This guide covers two products, because the job has two halves. One half is the cabinet run that carries the real load. The other half is the wall rack that catches the bulky stuff that refuses to stack.
The cabinet run that anchors the wall
A cabinet run is the spine of the whole garage. Get it level, get it into studs, and everything else in the room gets easier to place. Skip that and you are back to open shelving with a nicer finish.
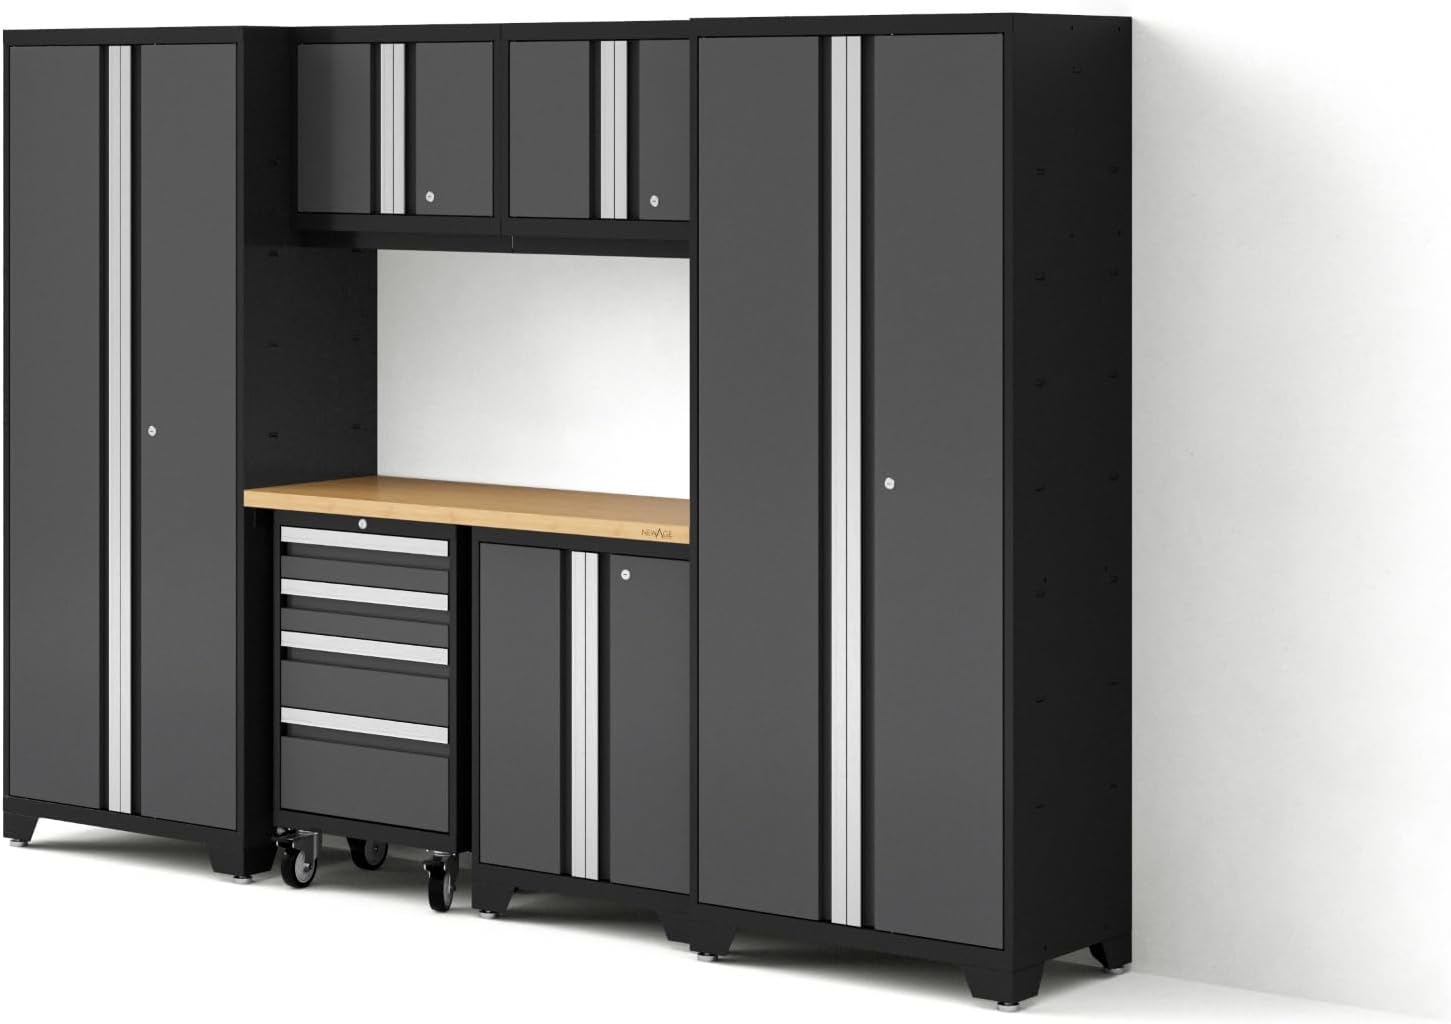
The anchor: NewAge Products Gray Bold Series 7PC Garage Cabinetry Set · 24-Gauge Steel · Fully Welded · 108" W x 18" D x 76.75" H, 50421
 Visit on Amazon →
Fully welded is the spec that matters most to me. Nothing to assemble means no wobble in the frame and no racking after a season of doors slamming next to it. The 24-gauge steel is honest homeowner material. NewAge sells a pro-grade line that costs a big jump more for mostly the same steel, and unless you are parking a welding shop against it, the Bold Series is the smarter buy.
The dimensions are what make it work in a normal two-car garage. At 76.75 inches tall it clears a standard 8-foot ceiling with room left for the door track above it, and 18 inches of depth keeps the run out of the parking lane. On a 20-foot-deep garage that leaves you a full bay to open a car door without playing bumper cars with your cabinets. The 108-inch width across seven pieces gives you a real wall, not a stack of mismatched boxes.
Caveats worth knowing before the truck arrives. Garage floors pitch toward the door, so plan on shimming the base rather than fighting the cabinets into place. Walk the wall first and note outlets, hose bibs, and the garage door track return, because none of those move for you. Fully welded cabinets are heavy and awkward, so line up a second person for delivery day. And if your wall is bowed, you will be running a ledger and filling gaps at the top rather than pulling a welded cabinet into a curve.
This is the piece that makes the rest of the garage worth organizing. Once the tools are behind doors, the open wall space you have left is genuinely usable.
The overflow fix for everything that will not stack
Every garage has a pile of light, bulky, unstackable stuff. Camp chairs are the worst offenders, because they are too big for a shelf and too worthless to earn floor space. Hanging them is the only answer that does not cost you a parking spot.
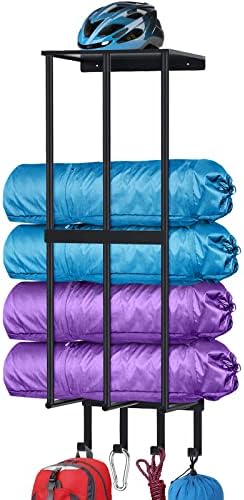
The overflow fix: Camping Chair Wall Storage for Garage, Metal Camping Chair Storage Rack Wall Holder, Floating Shelf, 4 Hooks, Stainless Steel, Beach Chair Rack, Umbrella Holder, Garage Chair Organizer, Matte Black
 Visit on Amazon →
Stainless steel construction, four hooks, a floating shelf on top, matte black finish. This is the piece that empties the chair pile: camp chairs, beach chairs, folding chairs, umbrellas. Mount it high and the chairs come off the floor permanently, which is the only real fix for items that never stack cleanly.
Put it in the first bay you walk into. Storage you have to cross the garage to reach does not get used, and a chair rack that nobody uses is just wall clutter with hooks on it. The floating shelf on top is where the umbrella and the bug spray live, which is the kind of small win that keeps the floor clear.
Caveats, and they matter. This is a sheet steel wall rack, so treat it as a chair and umbrella holder, not a tool rack. Nothing heavy goes on it, no tool chest, no engine parts. It goes into studs, not drywall anchors, because a rack that pulls out of the wall takes the drywall with it. Check clearance for the garage door track and for the door swing before you drill anything. And set the hooks at a height where you can lift a folded chair off with one hand, because two-handed storage does not get used either.
The actual install workflow
Now the part that matters. This sequence works on any garage wall, with any brand of cabinet or rack, and the order is not negotiable.
Step one: Find the studs before you buy anything. Use a stud finder, then verify by knocking. The framer who taught me could hear a stud through drywall from across the room, and you can learn the same trick: solid thud is a stud, hollow ring is a cavity. Mark every stud center with painter's tape at the height you plan to mount, and leave the tape up until the job is done. If you find a stud exactly where you need it, your whole install just got easier. If you do not, you need a ledger board or solid blocking, and you need to know that before delivery day.
Step two: Decide what goes on the wall. Write it down before you buy a single bracket. Tools you use weekly go at eye level. Seasonal items go up top. Chairs and long-handled gear go on hooks, high and near the door. This is the entire system. Everything after this step is just execution.
Step three: Check the floor pitch and the ceiling. Garage slabs are poured with a slope toward the door so water drains out. That slope means the floor is not level, and cabinets sitting on it will lean. Measure the gap under the front edge of a level cabinet and cut shims to match. At the top, confirm you have clearance for the garage door track when the door is up, not just when it is down.
Step four: Mark the cabinet height and draw the line. A level line across the studs is the reference for everything. Measure from the highest point of the floor so the run stays level even where the slab falls away.
Step five: Anchor into studs, never into drywall alone. This is the whole article in one sentence. Drywall anchors sold for ceiling storage and for wall racks are the reason I get called to fix other people's work. A cabinet or rack that carries any real weight goes into studs or into blocking you installed yourself. If the included hardware is not up to that, buy better hardware.
Step six: Shim the base. Set the cabinets on your shims, check level side to side and front to back, and only then start driving the anchor screws. Shimming after anchoring means fighting the wall.
Step seven: Tie the cabinets to the wall and to each other. Individual cabinets can walk. A bolted run does not. Connect the frames so the whole wall behaves as one unit, and anchor the run into studs at multiple points, not just the ends.
Step eight: Load from the bottom up, then recheck in a week. Heavy items low, light items high. Then, seven days later, put a level back on the run and check your anchor screws. New construction settles, and so does old framing. A five-minute recheck catches the problem while it is still a quarter turn of a wrench.
The competition and why it lost
Open wire shelving is the default in most garages because it is cheap and it installs in an afternoon. It also sags under point loads, cuts into cardboard boxes, and cannot hold a tool chest worth owning. It is a shelf pretending to be a system.
Plastic resin cabinets are fine for a rental or a garden shed. They do not take weight the way steel does, and they flex when the temperature swings, which is every day in an Ohio garage.
Freestanding steel shelving holds real weight, but it eats floor space and you cannot reconfigure it without emptying it first. A garage system you cannot reconfigure is just expensive shelving.
Ceiling racks are the best storage in the garage when they are done right and the worst when they are not. The failure is almost never the rack. It is the mounting hardware, and it is the guy who trusted the anchors in the bag instead of finding the joists. I do not write about overhead storage unless I can verify the joists and the hardware, and that is a separate article.
What this all costs
The cabinet run is the single biggest line item in a garage build, and it should be, because it is the piece doing the actual work. The chair rack is one of the cheapest fixes in the entire project and it clears more floor space per dollar than almost anything else you can hang.
The money people waste is not on the first purchase. It is on the second one, when the cheap shelf fails and gets replaced by the shelf they should have bought at the start. Buy the steel once, anchor it into studs, and divide the cost over the years you own the house. That math beats re-buying the same bracket every other spring.
Check current Amazon price on both pieces before you commit, and measure your wall before you order anything. The measuring is free. The return shipping is not.
The short version
Find the studs. Decide what goes on the wall. Anchor into framing, not drywall. Shim the base. Tie everything together. Load from the bottom up and check it again in a week.
That is the job. Your garage was built to hold this. Let it.